Thursday, 19 December 2013

Our last Workshop for this year.......

Time Flies when having Fun.The ladies decorated a plain  MDF clock.


What a transformation....just with Time Flies papers (PPOO1) , Card Candi in the Time Flies design (CC220) coloured with markers.The clock face has been die-cut using the Marianne Craftable Die - Clock Face (CR1234)


If we do not have time to update our Blog before Christmas ,we would like to thank everyone who has attended our workshops this year.
We hope you all have enjoyed them and have been inspired to carry on Crafting and we look forward to seeing you next year.


Merry Christmas and Happy New Year


Wednesday, 11 December 2013

Another week and we gave our ladies a project .....

Decorated Wooden Boxes


We took two plain wooden boxes and painted them with Distress Paint - Antique Linen and used Craftwork Cards - Time Flies Papers and Element packs to decorate the boxes.This beautiful collection has been inspired by Lisa Baker and illustrated by Steph Davies.  The collection contains papers, flowers, ribbons & bows, sentiments, labels and Candi.


In addition to the Time Flies collection we used some cutting and embossing dies to make the Flower Embellishment on top of the largest box.


The leaves are die-cut using Marianne Creatables Die - Leaves (LR0192),the pink scrolls are die-cut using the Nellie Snellen Shape Die - Corner (SD019) and the Flower in the centre is die-cut using Marianne Creatable Die - Rose Flower (LR0256).


Wednesday, 4 December 2013

Mollys' Christmas....


Hello Crafter's ,we have been busy again making cards using the New Christmas stamps from Molly Bloom.
Our ladies enjoyed the workshop and made these two cards.


Molly is delivering her parcels by Lamplight and Santa has his delicious Mince Pies at hand.


You can check out more lovely designs at Molly Bloom Designs by following the link in the "My Blog List" section.

Products used :-
Molly Bloom Cling Stamp - Candlelit Delivery (MB0287J)
Molly Bloom Cling Stamp - Jolly Nice Pies (MB0288J)
Molly Bloom Cling Stamp - Dressing the Tree (MB0289J)
Martha Stewart Punch around the Page Punch Set - Eyelet Lace (M42-60013)
Gingham Ribbon - Hunter Green (RIB854)


Thursday, 28 November 2013

Christmas in the Country - Stocking 

A Christmas workshop... our ladies made a Stocking which they can fill with Goodies and an Easel card.


To make a 3D Stocking - draw a stocking template approx 6"(15cm) in height.Cut out 2 stockings -one facing left and one facing right so you have a pair. Cut out pieces for the toes and heels.Cut 2 strips of paper 3"(7.5cm) in width x 12"(30cm) in length-Glue together and score each long side 1cm in from edge.Snip upto score line on each side.Glue tabs on one side ,secure onto stocking starting at the  bottom following the outline around heel and toe and then up the sides.Continue with the other side starting at the toe which will make it much easier to glue together.Make sure that the sides line up and the stocking is not twisted.Trim off any excess.Embellish top of stocking with punched paper strips,pom-poms,buttons etc.


A Christmas easel card using papers from the Papermania Christmas in the Country collection.Die-cut shapes have been layered to create the Topper and punched Holly leaves and a Button make the stopper.


Wednesday, 20 November 2013

At Christmas


At Christmas by Lucy Cromwell is a beautiful collection of papers,decoupage,Stamps,Ribbon ,Boxes and Tags.A 6" x 6" Album has been made from cardstock with a concertina spine and covered with patterned paper from the Paper Pack (PMA 160151).The stockings have been stamped and decoupaged onto the front of the album.Velvet Ribbon (PMA 367601) has been used to trim the card and  a sentiment has been added using the stamp which comes with the Stockings (PMA 907119).


We made an 8" x 8" square card using the 6" x 6" card kit( PMA 169060).We took the front of the card and cut off the back.Not to be wasted, you can us this on another craft project.Decoupage using all the elements in the pack to create a topper.Two layers of patterned paper from the paper pack have been used  for the background.A length of ribbon has been tied around before attaching to card front. A punched border has been added along the side of the decoupaged topper.The card has been finished with a bow.
It is hard to see from the picture ,but the card has been embellished with 3mm Gold Nailheads (MR1983) for the Baubles on the Tree and Poinsettia Garland along the Mirror and for a little sparkle which is a must on Christmas Cards we added Glamour Dust or you can use something similar. 


Wednesday, 13 November 2013

Cutie Christmas


Children's cards are wonderful to make .Here we have used the Kanban Clear Stamp set- Happy Christmas (STAMP9030) and this Santa is so jolly.


We have embossed the background with a Crafts Concepts Embossing Folder - Merry Christmas (CR900050) and then rubbed over the embossed area with Cosmic Shimmer Gilding Wax - Pewter .


This cheeky little Christmas Duck is fun.


Both stamped images have been coloured using Distress Ink pads as watercolours and the background has been embossed with Christmas Text.


Thursday, 7 November 2013

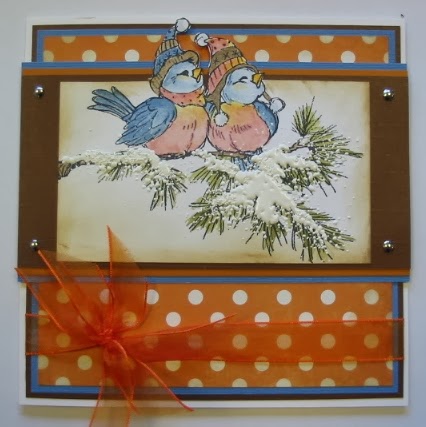
Winter Birds


We have some more Christmas Cards to share with you.This wonderful Stampendous Cling Stamp - Winter Birds(CRR180) is so adorable.
Matting and Layering is so effective ,here we have used Browns ,Blues and Oranges.


Another card using the Stampendous Cling stamp - Winter Birds(CRR180) in traditional colours,but we have embossed the background using an embossing folder Couture Creations - Adagio (C0723019).


The card is finished with torn edges inked with Distress Ink pad -Brushed Corduroy (TIM21421) and Frantage Chunky White Embossing Powder (FREG021) which is great for creating snowy effects.


All for Now ! Must get back to creating some more cards for you .